Brady_The
-
Posts
739 -
Joined
-
Last visited
-
Days Won
7
Content Type
Profiles
Forums
Blogs
News
Store
Everything posted by Brady_The
-
Hey Eranderil, welcome to the forum! The game is utilising command blocks for the eidolon fight. https://cdn.imgchest.com/files/e0714a145670.jpg I'd load into a testing world, go into Creative mode, head to the Resonance Archive and have a look for myself. Shift+Right Click should open the Edit interface. Here are some more information: https://wiki.vintagestory.at/Command_block I haven't used those before, so I cannot tell you if that is all you need. It's still a decent place to start, I'd say.
-
clientsettings.json in %AppData%\VintagestoryData
-
The VTML code could be counting towards the character limit per site. I'd do some testing with and without the code and see if there's a difference. There most likely will be. Then I would report my findings on https://github.com/anegostudios/VintageStory-Issues/issues. The devs most likely didn't think that VTML would be that heavily used. That should be an easy enough fix on their end, though.
-
Don't forget to report the crash on the mod page so that the author knows about and can fix it.
-
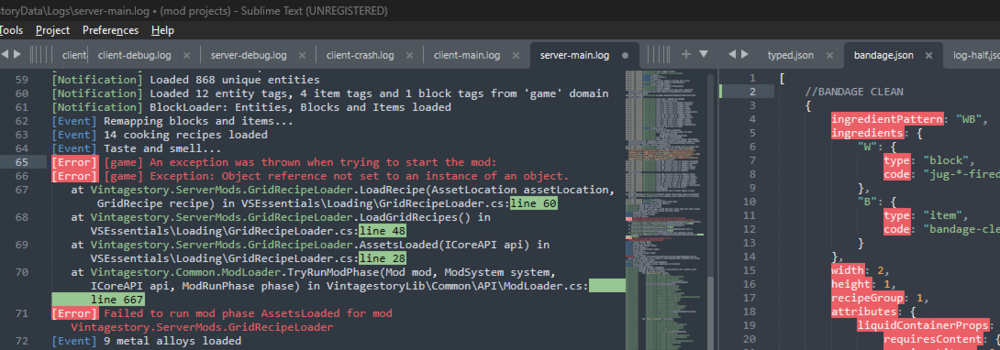
You are most likely running into the problem of escaping certain characters. Quotes in particular. This will break the language string: Because quotes are used in starting and ending a key, but are also used in certain VTML values, which when improperly used will confused the game because it assumes something is ending or starting when it really isn't. "lore-miller-piece1": "<font color="#b5e61d">The</font> <font size="25" weight="bold" color="#c36">Pond</font>[...] This will not: With a backslash you will tell the game to ignore or interpret any following character differently. "lore-miller-piece1": "<font color=\"#b5e61d\">The</font> <font size=\"25\" weight=\"bold\" color=\"#c36\">Pond</font>[...] You might find this mod interesting: https://mods.vintagestory.at/vtmleditor (Edit: The mod works with any language string loaded in the game, so mods should theoretically supported.)
-

Growing mushrooms
Brady_The replied to Micah Holmes's topic in Mod Development Questions/Troubleshooting
That's not the correct code. See skipVariants. You want to look at mushroom-side.json. -
Handbook grouping
Brady_The replied to Micah Holmes's topic in Mod Development Questions/Troubleshooting
That depends what you mean with grouping. You can consolidate blocks/items in the ingredients section in the handbook. "attributes": { "handbook": { "groupBy": ["seashell-{type}-*"] } } You cannot condense the handbook entries too many ways. You can filter out variants of assets, showing for example only north-orientated assets "creativeinventory": { "general": [ "*-north" ] } Technically you can "excludeByType" assets, but that'll remove the handbook entries completely (which doesn't make them uncraftable btw). "attributes": { "handbook": { "excludeByType": { "*-eidolon": true, "*-erel": true, "*-seamonster": true, "*-thunderlord": true } } } But that's about it. -
Welcome to the game and forum, TinyKittenKisses! If you bought this game from Anego directly via Paypal, you should have received a separate mail with the game key. For me it was almost instantaneously. If you bought it from an official reseller I can't help you. I don't know how the process works, but I'd be surprised if it were much different. Maybe you can find it in the purchase section of that resellers website. If you bought it via different payment processors it might take while, depending on how that processor works. Check your spam folder to see if anything was caught. If the key doesn't want to turn up, create a support ticket: https://www.vintagestory.at/support/

-
The pictured stew shouldn't hurt you. My first thought reading your topic was, that you used a poisonous mushroom in the cooking process, but you did not. Any negative health effects should be noted in the description. Are you using any mods that punish you if you eat something too hot? Is your player character allergic to onions or carrots? Jokes aside, from that screenshot alone I cannot tell you why you'd take damage from eating. It might be another mod doing something. I seriously doubt that this is a Vanilla issue. Can you reproduce taking damage when eating from that stew? Do you take damage when eating a stew with completely different ingredients? If you can repeat taking damage, I'd go ahead and utilise a binary search to find out what mod could potentially causing this.
-
There's a mod for that! https://mods.vintagestory.at/show/mod/31839 I haven't played VS in a while, so I haven't had a chance to use this mod yet, so I don't know if the keys are rebindable.
- 1 reply
-
- 2
-

-
crash anytime i look at Rye Bread recipie..
Brady_The replied to DetectiveGrim's topic in Discussion
The crash happens because two recipes contain old block codes. dough.json and candymilk.json have to be fixed. It's pretty easy to do it yourself if you know your way around zip files. Otherwise I'd wait for the mod author to resolve these issues. -
There's a lathe mod available. https://mods.vintagestory.at/woodlathe
-
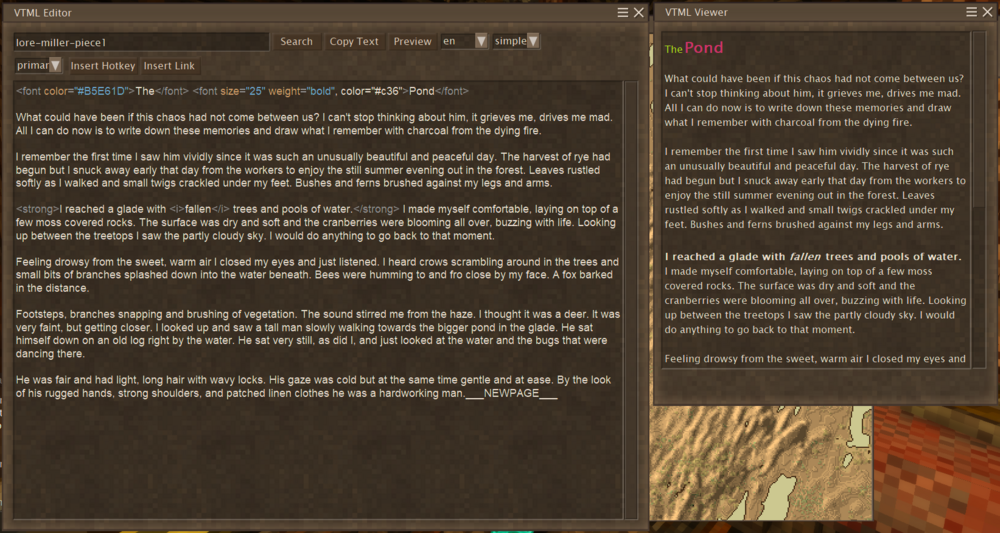
Windmills are tough to get look right. The full sails are too narrow and too short. The building is too massive in contrast to the fragile looking sails. I'd probably half the width of the tower. At least. That's a lot of work, though. I'd probably make a copy of this world, go into creative mode and test around a bit to see what works and what doesn't. With that said, Tyron spoiled some work on the sails on the Discord server:
-
According to the wiki the assets folder should be located at /users/{your username}/Library/Application Support/VintagestoryData. Resources: - https://wiki.vintagestory.at/Modding:Content_Tutorial_Simple_Recipe, - https://wiki.vintagestory.at/Modding:Content_Tutorial_Complex_Grid_Recipes - https://wiki.vintagestory.at/Modding:Content_Tutorial_Further_Recipes - https://wiki.vintagestory.at/index.php?title=Modding:Modinfo (Add the two mods as dependencies to avoid any errors.) - https://wiki.vintagestory.at/index.php?title=Modding:Mod_Packaging Depending on what you want to achieve this process is really quite simple. It would help to know what mods you are talking about, to be able to write an example that is less abstract.
-
How to capture piglets in pit without getting killed by parents?
Brady_The replied to Haltingpoint's topic in Questions
You should be able to place down and access the trap from above without entering the pit. -
Coding is very much a "black area" for me. I am afraid that I cannot help past my initial ideas. Temperature is utilising noise maps. I have no idea how exactly they work. A (very dirty) quarter-solution/first step could be to manipulate the "heatDamageAbove" value of crops if below shade blocks. I'd start by looking how the game handles these things. https://github.com/search?q=org%3Aanegostudios+heatDamage&type=code https://github.com/search?q=org%3Aanegostudios temperature&type=code https://github.com/anegostudios/vssurvivalmod/blob/84c80e85f36e31d3b6454021da0fbbba4cba71a3/BlockEntity/BEFarmland.cs There is also this mod, which manipulates temperature curves. Maybe it can be helpful to look at the code.
-
I can't say that I have done too much work with feed and troughs, so I probably cannot help too terribly much. What have you got so far? The trough files contain "quantityPerFillLevel" and "maxFillLevels" keys. Have you set them up appropriately for your intentions?
-
While you are anywhere in a claimed zone, execute "/land adminfreehere" in chat. This removes the claim. If you get an error message about disabled land claiming (should be on by default), you can enable it with "/wc allowLandClaiming true". Make a backup of the world before you do that. The "unclaiming" shouldn't break anything, but better safe than sorry.
-
What's the name of the mod?
-
Glue is imo very expensive. If you don't care too much about obtaining clutter without "putting any work into it", there's another option. "/worldconfig clutterObtainable yes" will remove the glue requirement completely.
-
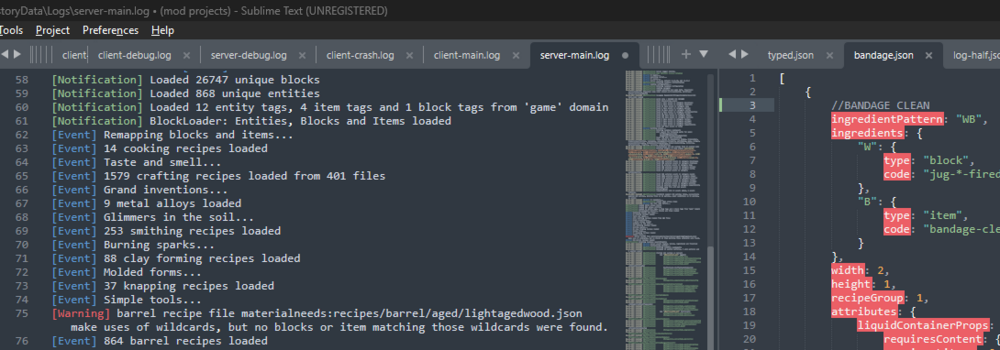
Unfortunately it didn't, but I appreciate the attempt. I definitely need the help of a codist. Going straight to the source I used regex written by the devs to eliminate any potential errors. Expectation: It does work. Result: It does not. (Even though the logs are squeaky clean.) Which leaves me with two explanations. Regex usage in recipes is currently not working, or the game is applying yet another rule set in recipes. [ { "ingredientPattern": "A,B", "ingredients": { "A": { "type": "block", "code": "@.*-(woad|horsetail|cowparsley|goldenpoppy)-.*" }, "B": { "type": "item", "code": "shears-*", "isTool": true } }, "width": 1, "height": 2, "shapeless": true, "output": { "type": "item", "code": "blade-longsword-admin" } }, { "ingredientPattern": "A,B", "ingredients": { "A": { "type": "block", "code": "@anvil-(iron|meteoriciron|steel)" }, "B": { "type": "item", "code": "hammer-*", "isTool": true } }, "width": 1, "height": 2, "shapeless": true, "output": { "type": "block", "code": "metal-scraps", "quantity": 5 } } ]
-
You can indeed. Though I would recommend you not to use this zip file as a base. It's a bit outdated. However, it's still very easy to change stack sizes without having any prior knowledge. You simply edit any game files you would like to change the maxStackSize in, then execute ModMaker.exe you can find in the installation directory and follow the instructions. You can also probably find a ton of mods doing this to any random number of assets on the ModDB. I believe one of them is called Configure Everything.
-
Moiré effect mitigation
Brady_The replied to HeadPilgrim's topic in Mod Development Questions/Troubleshooting
That's very possible. I haven't done too much texturing, but at some point I ran into a problem with textures similar to your. I don't know too much about the modelling/texturing process, so I took the easy way out and created a texture with a size that fit the asset perfectly. 128x128 is quite large, considering that one "metric" block is sized 16x16. -
Does any one know how to properly utilise this or may have come across a working implementation? I am particularly interested in the usage of multiple wildcards in one ingredient and the correct output format. Unfortunately I cannot read code to the extend necessary to hunt down the answer myself. Cheers! This problem is half-solved. What I am currently looking for is the correct usage of regex inside ingredients and how to forward these values into the output. (Due to the wording I suppose the latter isn't possible.) Which is the more complicated part, because from my experiences with VS Regex it seems to make up some own rules, similar to the JSON parsing. https://github.com/anegostudios/vsapi/blob/f0d94e1bb3dacde5efb15fd1e91a9486c9e70f15/Util/WildcardUtil.cs or https://github.com/anegostudios/vsapi/blob/f0d94e1bb3dacde5efb15fd1e91a9486c9e70f15/Common/Crafting/GridRecipe.cs#L255? This example is doing what I want it to do. At least partially. For some reason it's not resolving "up-north". I suspect it's the handling of the hyphen inside a recipe file (blocktypes use this format very regularly). Or, more likely, the "allowed-/skipVariants" contents only matter for filtering assets within the recipe, considering that "up" and "north" are both different variantGroups in the blocktypes, so any stair blocks are simply ignored, because the asset code use in ingredient B doesn't match the actual code of the asset. { "name": "Multiple Wildcards", "ingredientPattern": "A,B", "ingredients": { "A": { "type": "block", "code": "game:clayshingle*", "quantity": 32 }, "B": { "type": "block", "code": "game:clayshingle{wildcard1}-{wildcard2}-{wildcard3}-free" } }, "allowedVariants": { "wildcard2": [ "black", "blue", "brown", "cream", "fire", "gray", "orange", "red", "tan" ], "wildcard3": [ "down", "up-north" ], "wildcard1": [ "labs", "stairs" ] }, "skipVariants": { "wildcard2": [ "black", "blue", "brown", "cream", "fire", "gray", "orange", "red", "tan" ], }, "width": 1, "height": 2, "shapeless": true, "output": { "type": "block", "code": "game:clayshingle{wildcard1}-{wildcard2}-{wildcard3}-free", "quantity": 32 } } Notes: - The recipe above is just an example, demonstrating the usage of the new keys. If a variation doesn't appear in "allowedVariants" it won't be utilised, "skipVariants" is not needed in this case. Generally both should be considered an either/or. - Wildcards used in the ingredients don't have to be used in the output. You can use that to filter recipe patterns even further.
-
Recipe not working
Brady_The replied to Micah Holmes's topic in Mod Development Questions/Troubleshooting
I specified above. Comments inside curly brackets are okay, comments outside curly brackets trigger this error.