SpookyJ
-
Posts
16 -
Joined
-
Last visited
SpookyJ's Achievements
")
Berry Picker (2/9)
18
Reputation
-
The point about cementation furnaces taking way too damn long is a good one. Having a finery structure that speeds up that process might not be too bad, otherwise your offset is just building more cementation furnaces and working them in parallel (which is more or less what I had in mind). At that point in the game having multiple furnaces running is pretty easy to do. Coal veins are often very large and you can clear them out quickly with ore bombs. Having a very late game multiblock finery that enables true mass production of steel could be a really cool goal to work for. As for smaller furnace designs i'd love to see what you have in mind. A simple mockup in creative will do. It would be good to have more than one design concept here, that way the devs can pick and chose elements they like. It all depends on what the developers have planned for the steel age I suppose.
-
Likely not going to happen. Having everyone from spongebob to goku to saddam hussein running around would kill the vibe. This really isnt that kind of game and custom skins just aren't a good fit.
-
Im aware of the wine nerf. It used to be pretty good but it only lasted like 50 days in a cellar. I think they should absolutely un-nerf the satiety in exchange for more effort to get the current shelf life. If unbottled wine didnt last all that long, but bottled wine had the current shelf life and required more resource investment, then they could easily reverse that change and have it be more balanced.
-
Cork is made from cork, not oak. I would like a way to preserve juice though since wine is absolutely terrible now.
-
Yeah this is more or less my thoughts as well. Im sure there is some way to make it feel a little more realistic and find that realism/gamplay balance. The important bit is that the furnace, whatever they end up calling it, enables high volume steel production. Steel absolutely will be more important in future updates and high volume production will be important. Removing the process of turning blooms into iron is how you do that in-game. Adding another process to turn cast iron into wrought iron so you can then turn it into steel would kind of defeat the purpose. Im sure the team will find a good solution one way or another.
-
Most of the inaccuracies arrise from gameplay concessions, yes. Its simpler to go straight from the blast furnace into a player made sand mold, but if you have an alternative process please do post a detailed reply. As long as the process feels rewarding people will enjoy it. Ultimately its up to the developers to decide what implementation they like best. Im hoping for this thread to become a pool of ideas they can pull from. More interpretations is better.
-
Im all for natural brine pools since it would let you pickle veggies early, but I think being able to boil brine or seawater for salt would make finding halite pillars far less exciting. If you can get infinite salt from seawater, no matter how little or inefficient, no matter how complex the process, would be way more convenient than searching for halite and would ultimately make halite pillars feel less special. There is already an alternative to finding salt pillars in the form of traders selling salt and that is far more balanced since it costs money and isn't always available.
-
 Im waiting for them to implement their version of quarrying. I dont like how tedious making ashlar blocks is in vanilla.
 -
@MKMoose A lot of good points here. I'll try my best to respond This is the exact thoughts I had when I put together this thread. Cast Iron would serve as another big step in progression just like getting your first saw opens up so many new recipes and possibilities, I want Cast Iron to open up a whole range of new automation. Exactly. Cast Iron would serve as the gate keeper for automation of anything that needs complex metal components or a crankshaft. The bellows obviously, but also automatic spinning wheels, Looms, a Sawmill, a Lathe for woodworking, an automatic sieve for mass paper manufacturing, a printing press for copying books, a mixer for aiding in cooking and doughmaking, pumps for moving around liquid, all kinds of new mechanics would be possible. Cast Iron should open up a lot of new automation options for the player and be a big step in progression overall. Exactly. The goal here isn't to replace Iron or steel but to introduce a new metal into the game that can maybe diversify metalworking a bit. making individual axles and gears on the anvil by smithing would become tedious very quickly. It doesn't. Under this system you would still need to use bloomeries to create iron tools, armor, weapons, as well as plates and rods. Cast Iron would not replace regular Iron for those purposes and any crafting recipe requires iron nails/rods/plates etc could not use cast iron as a replacement. Cast Iron ingots would really only be useful for speeding up steel production, and steel production still requires the helve hammer for blister steel -> Steel so it wouldn't be reducing the need for helve hammers at all. You would be reducing the number of times you need to use the helve hammer sure, but not the overall need for one, because you definitely still need it, if that makes sense. On top of that, though this isn't within the scope of this thread, the helve hammer really should be able to automate the breaking of ores into nuggets. Don't understand why that isn't already a thing. Drives me nuts. This has been brought up before and my general thought is that it's not really necessary. Yes it's inaccurate, but it's honestly fine to lump pig iron and cast iron together for player convenience and simplicity. This is a fair point, but the same could be said of the beehive kiln, albeit to a lesser extent. It's not so good for small batches, but firing tons of shingles or bricks? it's absolutely worth it. Bulk smelting iron for decorative items would absolutely be something players would want to do. Need a lot of iron fences for your base? want a fancy dining room with candelabras and chandeliers? you will absolutely want to be able to do large batches. That's not even mentioning the cast iron mechanisms which would also benefit form mass production. That being said it would still be useful even if you aren't bulk smelting 72 ingots at a time just due to the speed of the smelts alone. in fact, smaller batches of 12 to 24 would be significantly faster than using a crucible, and by a large margin too. I don't see players ever regretting spending the time and effort to set one up. Also, I am definitely predicting the future a bit here, but I can see steel becoming much more important in the future than it is now. One of the biggest problems with steel is that it doesn't really have much use outside of tools and armor. That will likely change however. At some point steel could end up being as big of a progression step as copper, who knows, but this is preparing for that, enabling large volume steel production at an accelerated pace that will likely be necessary for future content like train tracks and what have you. As for two different blast furnaces, I'm a bit on the fence about that. on one hand it could be nice, but on the other hand the progression jump would be less impactful since you aren't expending as much effort as you would setting up the big one. This is one of the core philosophies of VS game design in my opinion. They make you work for things but that work gives you a feeling of satisfaction. I'm not entirely against a smaller design, but this is something we need to consider nonetheless. If you have an idea for a smaller design I encourage you to post a concept image like the ones I have made to add to the discussion. I'm not sure if this is in reference to anything in particular or if I'm misunderstanding something, but all of the cast iron furniture described is assumed to be 1x1x1. This is absolutely a valid concern going forward. I don't see cast iron decorative items replacing anything however. they are just another option ultimately. If you want a red flower pot for your build you are gonna use the red flower pot and not the cast iron one. I've used metal cooking pot mod before and it's honestly quite fine. In terms of cooking you really don't want do smaller batches in the metal pot, it's very useful for large batches of food like jam making or bulk meal making but ceramic pots are definitely more convenient for smaller batches. If you are looking for potential downsides that could be the angle. I can easily see Cast Iron pots being less efficient for smaller batches than a ceramic pot but more efficient for bulk cooking. Also there is the downside of not being able to cook non-meal items with it. I think there can be suitable overlap where players will use both. this is an interesting idea. currently I have the cauldron as being the non-meal cooking counterpart to the cast iron pot but maybe it could work with accelerating dye making and other things. That's fair. At that point I would leave it up to the developers as to what direction they want to take. I was thinking about basically the same thing but it fell outside the scope of this suggestion so I omitted it. Basically for midgame mechanical power progression you could create metal reinforced axles etc. This would allow you to simply upgrade your wooden mechanical components. It's only later when you get access to really high torque and high speed power sources like steam power that you would need replace most things with cast iron mechanical components. That being said, there is nothing stopping player from repurposing those wooden or reinforced wooden components in separate drive trains. If you already have a windmill powering querns, you don't need to upgrade that to cast iron. Wood will work fine. and you could use the parts you are replacing with cast iron to expand your milling operations, or even to provide power for some other industry you gain access to like paper making, looms etc.
-
Quarry mod still works
-
SpookyJ changed their profile photo
-
Im aware its not at all accurate to real life. In my mind the gameplay experience is more important than absolute true to life accuracy. Technically the iron coming out of the blast furnace wouldnt really even be cast iron but pig iron or something like that. I dont think it really matters as much. More important is the ability to mass produce iron ingots for steel making as well as make new items etc. Simplifing and handwaving the process is both necessary and inevitable.
-
I doubt they would ever want to replace bloomeries entirely, but it would sort of replace them in some ways, at least for making steel.
-
Spears are already too powerful
-
@Vexxvididu Its meant to be more of a companion to the cementation furnace rather than a replacement or upgrade. You dont have to fiddle with multiple bloomeries, you can cast 72 cast iron ingots in one go in far less time. Those ingots can go directly into the cementation furnace to be turned into steel. No need for helve hammer pounding of iron blooms. It would save a lot more time than you might think. The closest thing to it would be the beehive kiln, which serves as a massive upgrade for firing pottery. Think of this as a beehive kiln for smelting. High upfront cost but absolutely worth it. Also, I should have specified "in game hours" because 2 hours in game is like 4 minutes. 24 ingots in only ~4 minutes with a fully automated blast furnace would be a huge deal.
-
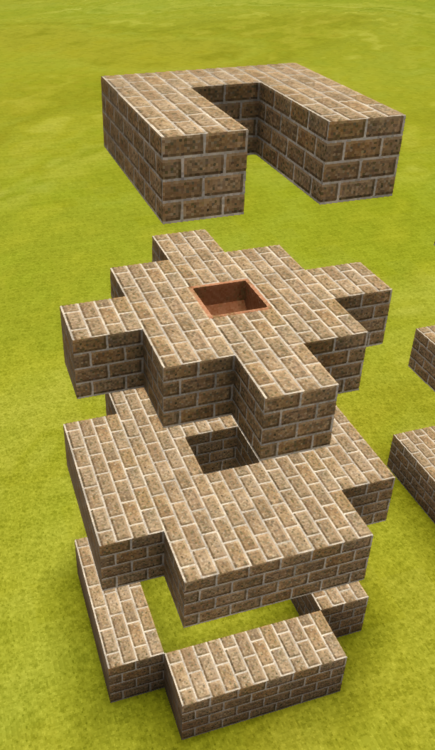
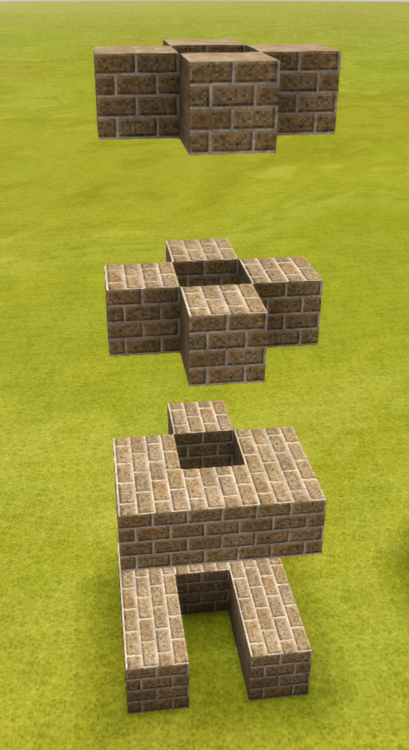
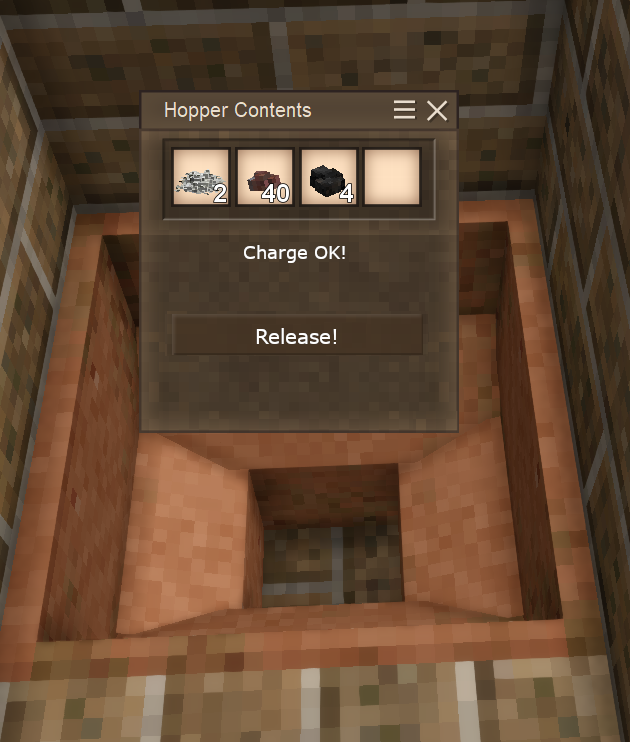
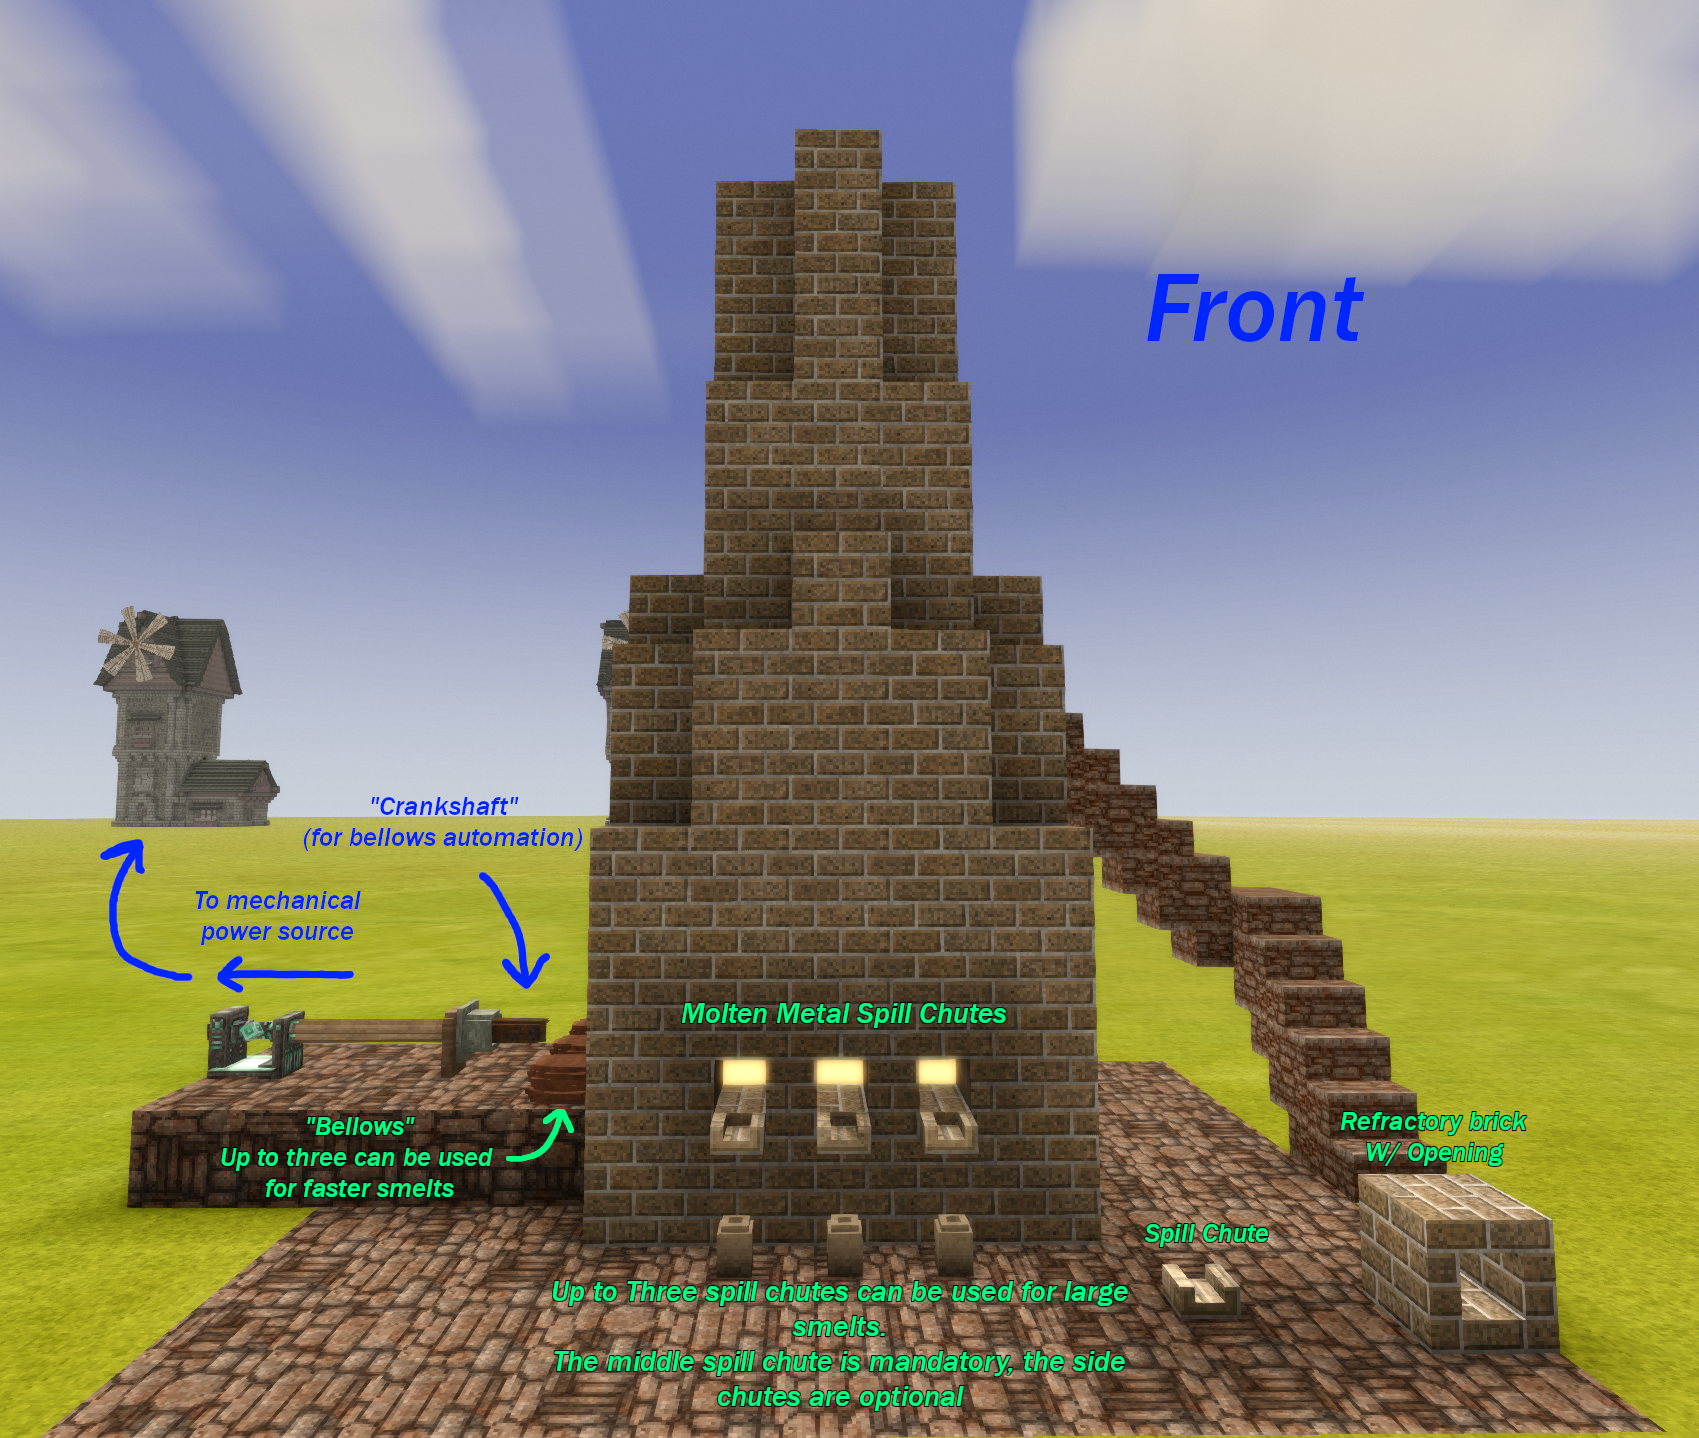
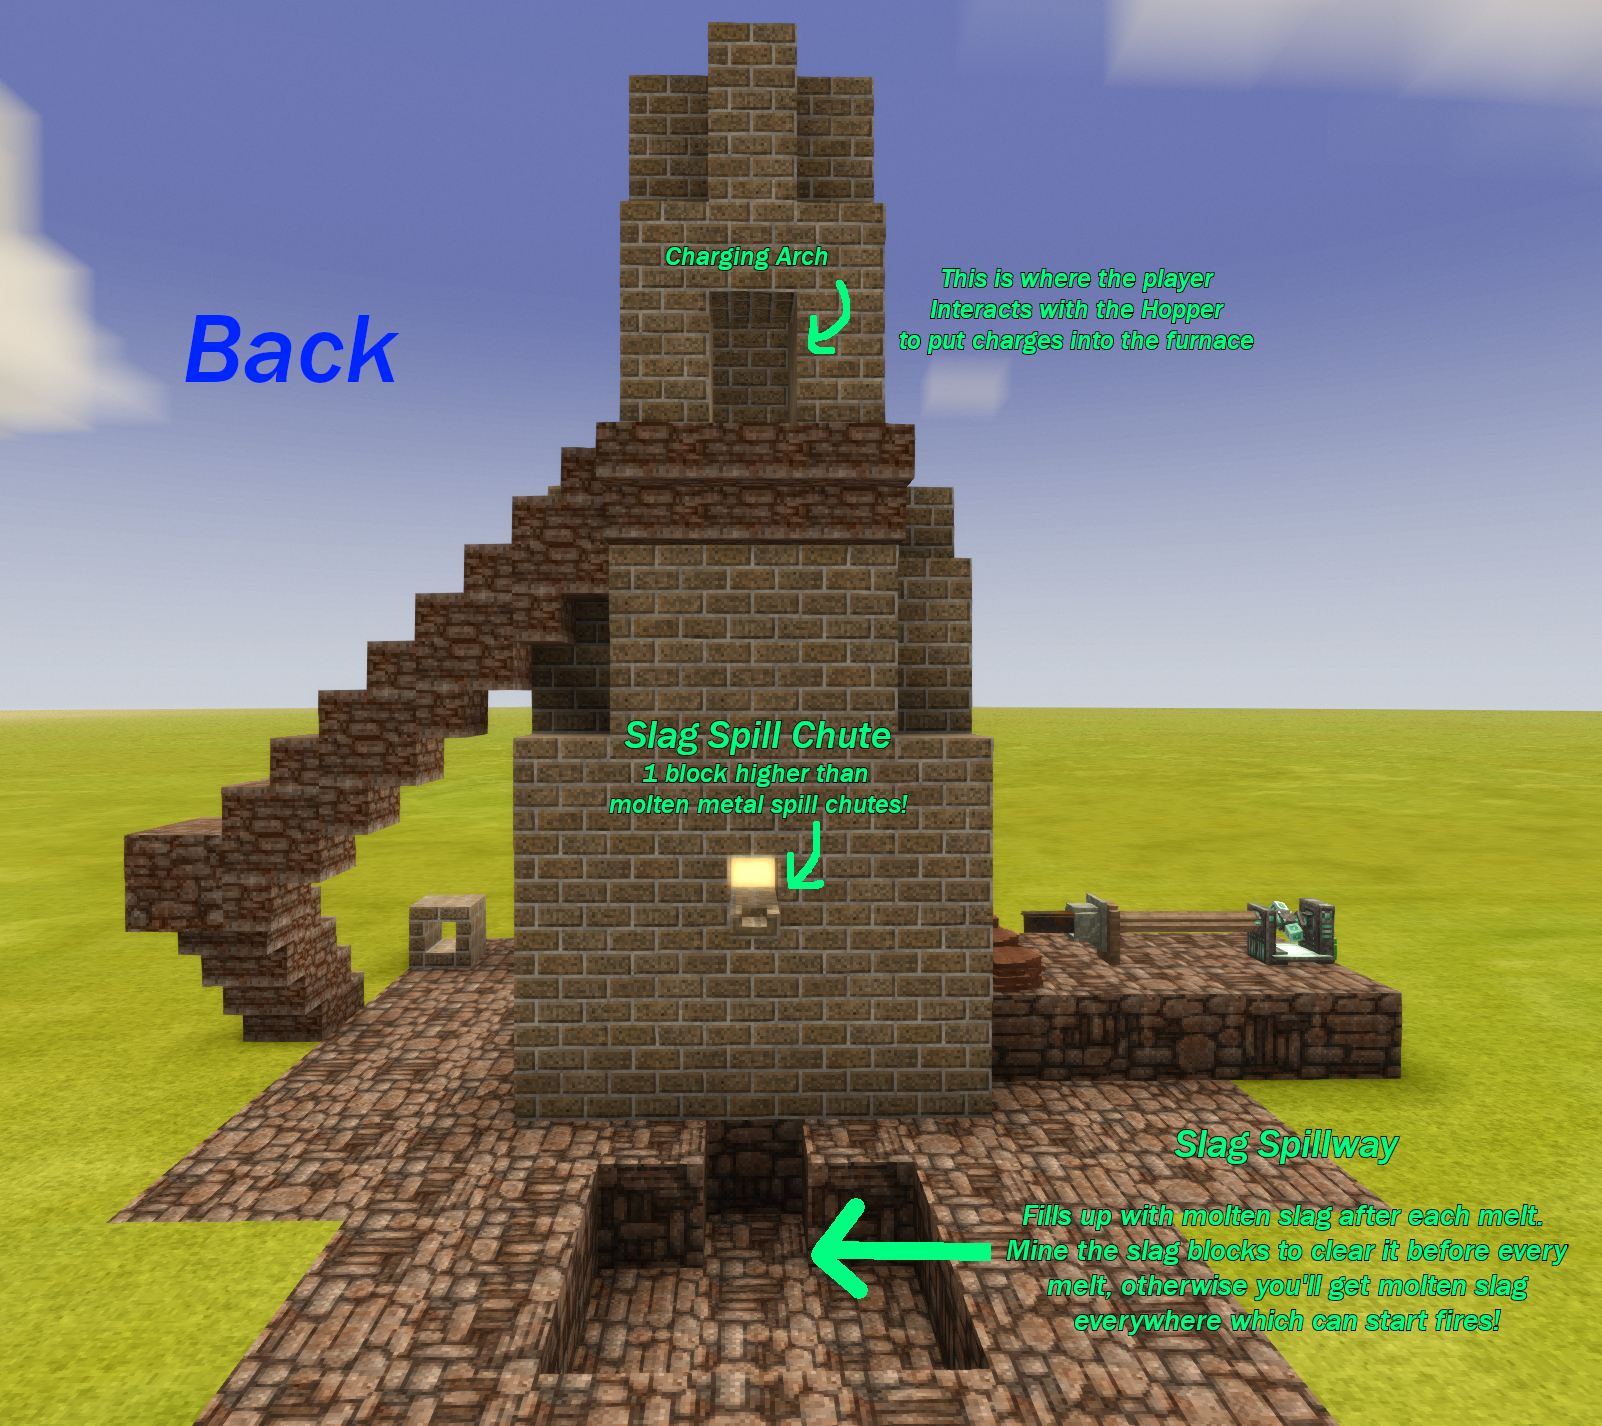
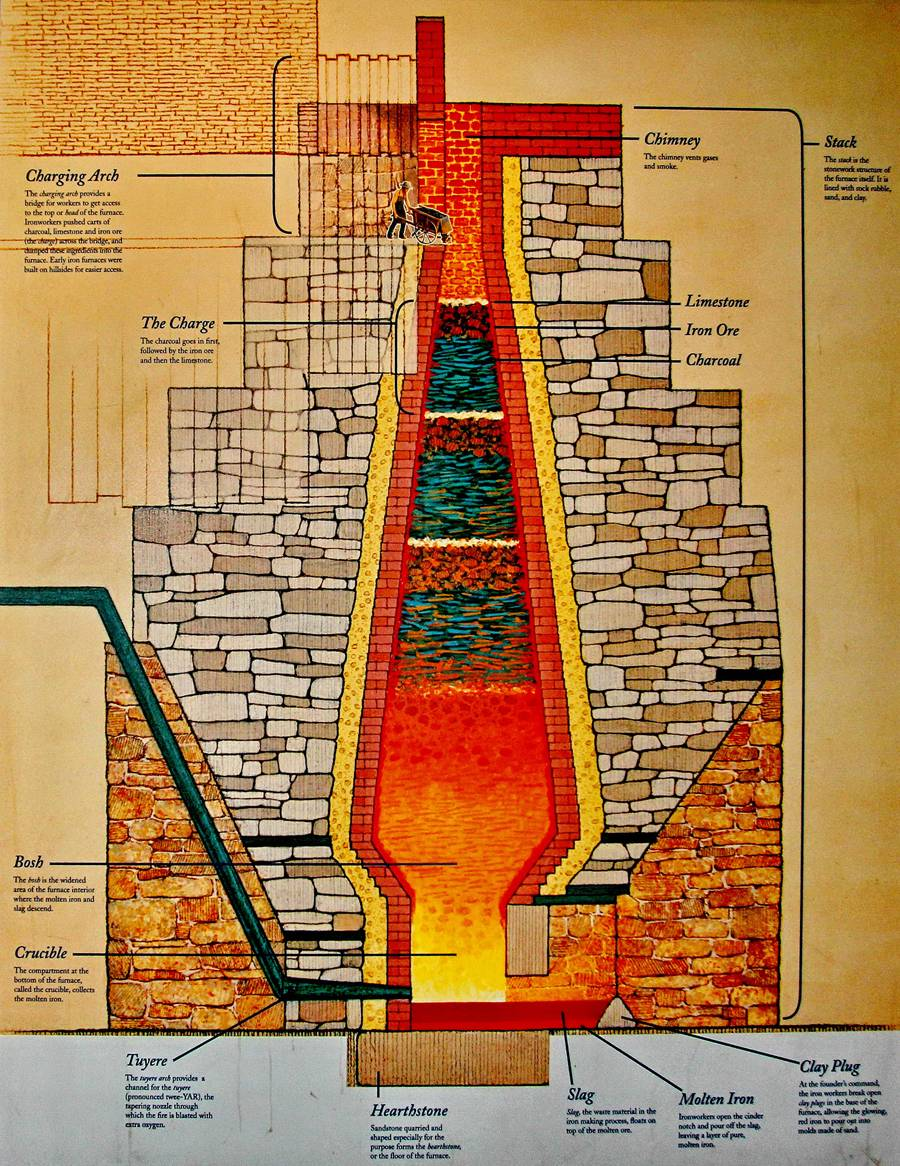
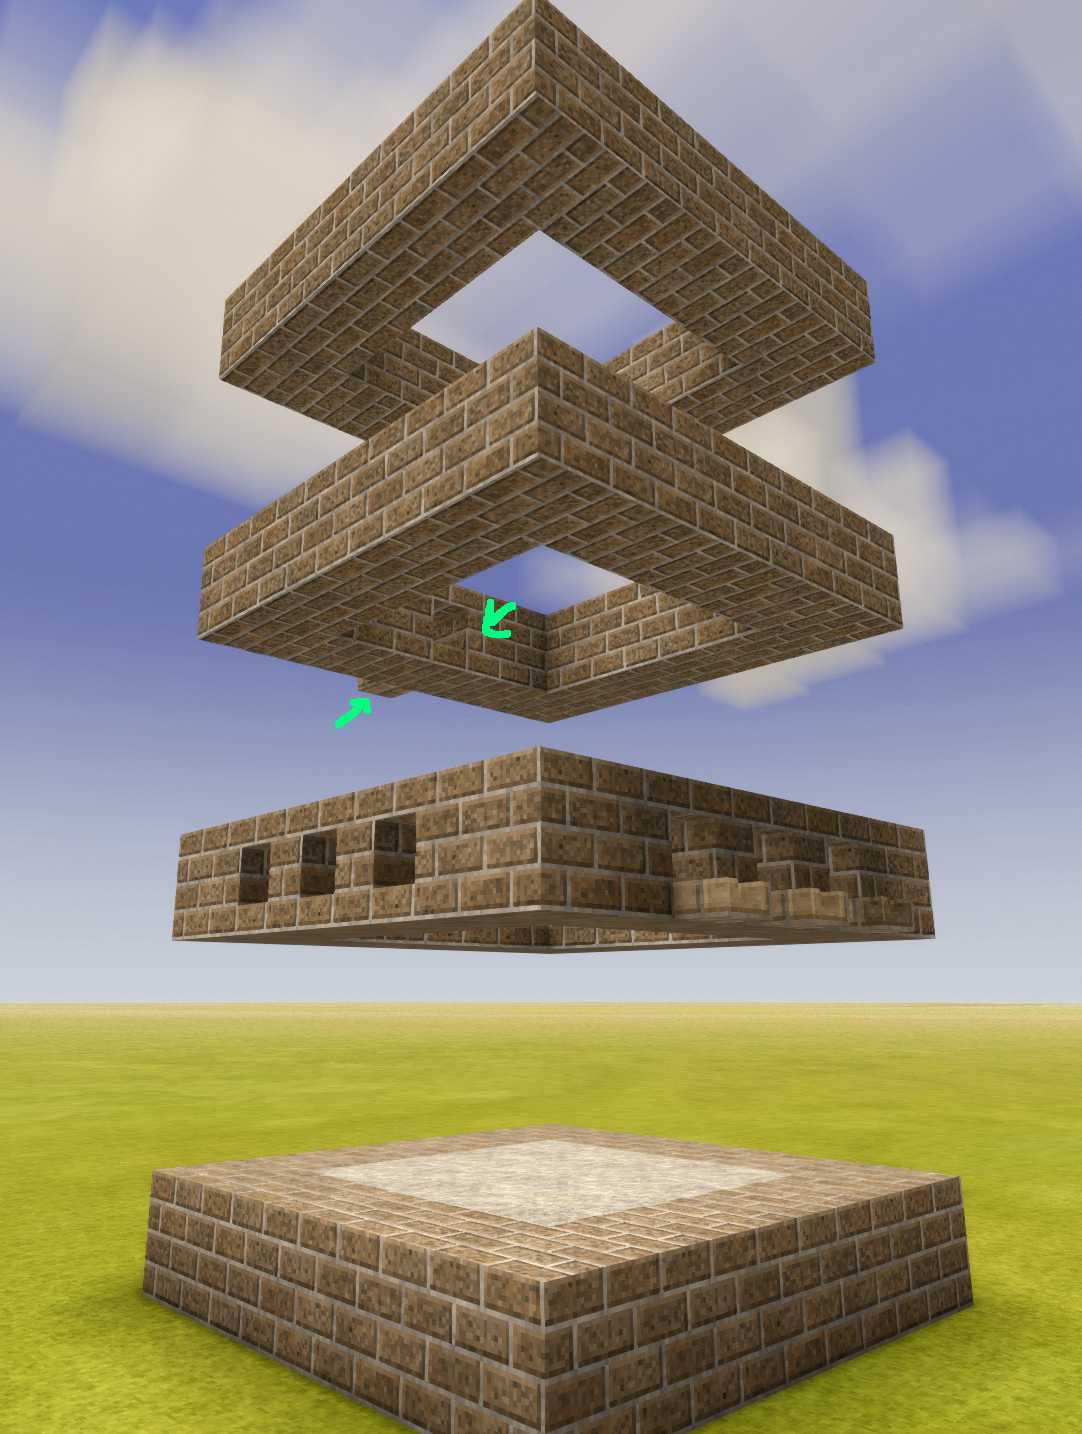
Preamble This is a bit of a long one. I've come up with hopefully a convincing framework for adding a Blast Furnace to the game as well as Cast Iron as a new metal with many potential uses. This is a very comprehensive post which goes into detail on how the in game mechanics could work. I will update this post as needed to tweak things based on feedback, if you have any ideas or suggestions let me know. Blast Furnace Rationale The Blast Furnace serves as a late game upgrade to the crucible, allowing the player to make large batches of metal items, ingots, etc fairly quickly. The blast furnace also allows for the creation of Cast Iron and its associated items, which would be used for upgrading automation drive trains among other things. (more on this below). It does not outright replace bloomeries however. You must still use bloomeries to create glass, as well as to make iron tools/plates/rods/armor etc as Cast Iron is not suitable for forging. Cast Iron plates, rods, etc can only be used for recipes that call for Cast Iron. Cast Iron and regular Iron are not interchangeable with one exception, Cast Iron Ingots can be used in place of regular iron ingots in a cementation furnace for steel, so it can help speed up steel production once you've reached the steel age. Importantly, Steel is not required for Cast Iron production. Any level of Refractory bricks can be used to make the furnace, but Tier 3 is recommended. The very high heat of the furnace will damage the bricks of the furnace at a much higher rate than the cementation furnace. Tier 2 bricks will break more often, but will work well enough. Tier 1 bricks are not recommended. In game concept: New blocks & Items Some new blocks and items would need to be added in order for the blast furnace to work as a concept. They are as follows: Refractory brick opening A refractory block with an opening. Used to allow air from bellows into the furnace as well as molten metal and slag to flow out of the furnace. One for each Refractory block type. Spill Chute Used with Refractory brick openings to direct molten metal and slag out of the furnace. The molten metal Spill chutes will pour only when there is a crucible directly underneath them. No threat of waste. Using multiple crucibles for large smelts is recommended. I've used fireclay here only for visibility. They would be made from Refractory bricks. Crankshaft Made from cast iron. When attached to a bellows it allows mechanical power to automate pumping of the bellows. Hopper w/ Flap Serves as the interface for filling the furnace. Referred to as Flap hopper and flapped hopper. can't think of a better name Ore Charge block A technical block used by the game to populate the furnace. There should be one for each metal in the game. When fully melted the molten slag and metal will automagic out the spill chutes. Solidified metal If you wait too long to pour the metal in the furnace it will solidify into blocks. You will have to use a hammer and chisel to bust them up into bits and try again. Molten slag New kind of liquid that pours out of the blast furnace after each smelt. If you do not have a spillway to catch the slag it will flow everywhere. Can set fire to flammable objects and players. Solidifies over time into slag blocks. The amount of slag produced depends on how many charges are smelted. At the full 36 charges 18 slag blocks will be created (1 slag for every 2 charges). Slag blocks The solidified molten slag from the furnace Mine with a pickaxe to get slag rocks. Building the blast furnace Layer 1-4 Layer 1 5x5 Refractory brick with 3x3 of any Raw Igneous Stone. (Hearthstone) Layer 2 Increase wall height by 1 block. Up to 3 Refractory openings in the front, with spill chutes attached. The finished melt will flow from here into placed crucibles. Up to 3 Refractory openings on one side. These are the openings for the bellows to stoke the flames. More Bellows equals faster smelt times! Layer 3 Increase wall height by 1 block One Refractory opening in the back with spill chute attached. This is for the slag to spill out from. Layer 4 Increase wall height by 1 block. Layer 5-8 Layer 5 Increase wall height by 1 block, ignore corners. Layer 6 Increase wall height by 1 block. Fill in center leaving a one block opening. Layer 7 Diagonal square shape with a one block opening in the center. Put the Flap Hopper in the center. Layer 8 3x3 Horseshoe shape with opening facing the back of the furnace. Layer 9-12 Layer 9 Repeat layer 8. Layer 10 One block on the front, 2x3 horseshoe shape with the opening facing the front. Layer 11 Diagonal square shape with a one block opening in the center. Layer 12 Repeat layer 11. Filling the blast furnace In order to smelt ore in the furnace you must fill it with “Charges”. This is done by interacting with the Flap Hopper in the charging arch. A "Charge" consists of Ore nuggets, Fuel, and, if smelting Iron ore, flux. The player can smelt ANY metal in the game except for steel in the blast furnace including alloys, so long as the alloy rations are correct. Flux (Lime or Powdered Borax) and Coke are specifically required for Cast Iron smelts. Any other ore or alloy can use Black Coal, Anthracite or Charcoal and doesn't require flux. Each charge = 2 ingots of metal, or 40 ore nuggets. Each Charge requires 4 fuel Each charge when placed by the hopper is a full block. A full blast furnace can smelt 2 x 9 x 4 or 72 ingots at a time. Hopper w/ Flap This is placed in the charging arch and is what the player uses to fill the furnace. The hopper has an inventory and a flap that remains shut until the charge recipe is entered correctly by the player. The player will have to place the charge materials into the inventory in a specific ratio. Once the ratio of fuel/flux/and ore are correct, the player can press a “Release!” button in the gui. The hopper flap will open and populate the blast furnace with the appropriate amount of charge blocks automagically. The minimum number of charges that can be smelted is 4. Smaller smelts are better done on the firepit! You can put more than one charge into the furnace at a time, as long as the ratios are correct! Doesn't let the player overfill the furnace and will warn the player if they attempt to do so. Will also prevent the player from mixing multiple different kinds of charges in the furnace (ex. Tin Bronze and Iron charges) When the player is done populating the furnace with charges they can light the furnace Lighting the furnace To light the furnace, use a torch through one of the bellows openings, targeting an ore charge block. The ore charge will light and then slowly light any nearby charges. Once lit, the furnace will begin to smelt the ore. The bellows will need to be pumped during the smelt either manually, or automatically using a crankshaft and mechanical power. If done manually, the player will have to pump the bellows for at least ¼ the total smelt time. This is cumulative and doesn't need to be continuous. The bellows GUI should let the player know when they have pumped enough. Making a crankshaft or two for your first smelt is recommended! The speed of the smelt is determined by how many bellows are used to provide air to the furnace, as well as how many charges are in the furnace. More bellows will decrease the smelt time. More Charges will increase the smelt time. These numbers can be tweaked for balance! 1 bellows w/ 12 charges (⅓ full): ~8 in-game hours. 2 bellows w/ 12 charges: ~4 in-game hours. 3 bellows w/ 12 charges: ~2 in-game hours. A fully automated blast furnace will smelt rather quickly! Once the furnace is finished smelting, molten slag will spill out of the rear chute and into your spillway and molten metal will spill out of the spill chutes into your placed crucibles. Fireclay Crucibles are recommended as molten iron is too hot for regular crucibles and will break them! You can then grab your crucibles with tongs as normal and begin pouring them into molds. Cast Iron Cast Iron is used for a variety of different applications in real life, from furniture to cookware to machine parts. For Vintage Story I feel the same breadth should be represented! You would be able to upgrade that old ceramic cooking pot with something a bit larger, as well and create mechanical components for use in mechanical power trains, and hopefully much more! As previously mentioned Cast Iron requires Coke as the smelting fuel as well as a form of flux (lime or powdered borax) for each Charge. For One Iron Charge: This ratio can be tweaked for balance! 2x lime or 2x P. Borax 40 iron ore (2 ingots worth) 4 Coke When smelting cast iron, the crucible you use to catch the molten iron must be a fireclay crucible. Regular crucibles won't cut it! They will break and you will lose your metal. Also keep in mind, If the molten iron solidifies in the crucible there is no way to melt it again! You will have to bust out the hammer and chisel and break your crucible to get the iron out. Sand Casting Unlike other metals Cast iron cannot use standard ceramic molds. Instead the player will need to create sand casting molds. These molds have an associated durability. With the sandstone and olivine sand having around 15 durability, or 15 casts before the mold breaks, whereas the fireclay derived Chamotte molds have double that at 30 casts. These numbers may seem fairly low, but most molds will get used only a few times and the player will likely make many molds for bulk items anyway, so this seems about right. In order to imprint the mold with the desired shape, the player must use a “Pattern Item”. These are items that will form the sand casting mold. Some Pattern items are made by the player by smithing specifically for use as mold patterns, but most are regular items you can make, find, or purchase. Don't leave your sand molds out in the rain or they will break, even without any molten metal in them! Minimum number of units that can be smelted by the furnace is 800, prepare your molds accordingly. Mold making process Cast Iron molds require sand casting and only certain "base sands" will work. Sandstone sand (high in silica content) Peridotite sand (in place of “olivine sand”) “Chamotte sand” - Calcine fireclay in a firepit Once you have your base sand you must mix it with a binder, water and clay, in a barrel. This will create casting sand (or chamotte casting sand) To make a mold you need A mold form. (crafted from boards and nails and strips.) Casting Sand A mold “Pattern Item” Now you can make your mold. Place the mold form on a solid surface. Right click and add casting sand into the mold. 4 casting sand is required for one mold Place in the appropriate “pattern item” to create the mold you want. Wait a short while for the mold to set Once the mold sets you can extract the pattern item with right click. Your sand casting mold is now ready for use! In real life it takes 2 halves to make a mold, but for simplicity and player convenience only one will be necessary. Pattern Items: These are Items used to form sand casting molds. There is no associated durability loss; you can use pattern items as many times as you want to make as many molds as you want. Smithed patterns can be placed on the ground for convenience. [Pattern] -> [Mold the pattern makes] Smithed on an anvil using any suitable metal Cast Iron Pot Base Pattern -> Cast Iron Cooking Pot Base mold Cast Iron Pot Lid Pattern -> Cast Iron Cooking Pot Lid mold Cast Iron Pan Pattern -> Cast Iron Pan mold Cast Iron Stove Door Pattern -> Cast Iron Stove Door mold Cast Iron Stove Legs Pattern -> Cast Iron Stove Legs mold Cast Iron Stove Body Pattern -> Cast Iron Stove Body mold Crankshaft Pattern -> Crankshaft mold Uses items as a pattern Chandelier -> Cast Iron chandelier mold Any Planter -> Cast Iron Planter mold Any Pot -> Cast Iron Pot mold Cast Iron Chair -> Cast Iron Chair mold Cast Iron Table -> Cast Iron Table mold Brazier -> Cast Iron Brazier mold Rusty gear -> Small Cast Iron Gear mold Large Rusty Gear -> Large Cast Iron Gear mold Any Metal Plate -> Cast Iron Plate mold Any Metal Rod x2 -> Cast Iron Rod mold Wooden axle x2 -> Cast Iron axle mold Flywheel -> Cast Iron Flywheel mold Aged or Brass Torch Holder -> Cast Iron Torch Holder mold Cauldron -> Cast Iron Cauldron Iron Fence/Ornate Iron Fence -> Iron Fence/Ornate Iron Fence mold Iron Fence Top/Ornate Iron Fence Top -> Iron Fence Top/Ornate Iron Fence Top mold Candle Holder -> Candle Holder mold Candelabra -> Candelabra mold Cast Iron Post x2 -> Cast Iron Post mold Any Metal Ingot x2 -> Cast Iron Ingot mold Cast Iron Items These are various ideas I've come up with for items that could be made using Cast Iron as a material. If you have any other suggestions feel free to let me know! Cookware Cast Iron Cooking Pot Made from multiple casted parts which are crafted together Can cook 24 meal portions at once Cannot cook non meal recipes Cast Iron pot base (300 units) Cast Iron Pot lid (100 units) Too large for an Elk to carry! Cast Iron Pan (200 units) Can cook meat more quickly than just on a firepit, requiring less fuel and extracting more satiety (320 sat from “well cooked redmeat” instead of 280 for example) Can be placed over a firepit or on a Cast Iron stove Can be placed on your elk in the cooking pot slot Could also be used to fry foods Cast Iron Stove Made from multiple casted parts which are crafted together Cast Iron Stove Door (100 units) Cast Iron Stove Body (500 units) Cast Iron Stove Legs (200 units) More efficient than the clay oven for baking. keeps heat longer and can hold more firewood. Can also be used to cook with pots or pans on top! Cast Iron furniture Iron fence (and iron fence top) (200 units for 8 ) The vanilla iron fence Iron fence gate Crafted with iron fence sections and iron nails and strips Ornate Iron fence (and top) (200 units for 8 ) An iron fence with a more ornate design Purchased from trader or found in ruins Cast Iron Chair (200 units) Purchased from trader or found in ruins Cast Iron Table (200 units) Purchased from trader or found in ruins Cast Iron Lantern An ornate lantern crafted with Cast Iron plate and glass Cast Iron Post (200 units for 2) Purchased from trader or found in ruins Great for placing your lanterns onto! Cast Iron Planter (200 units) Cast Iron Pot (100 units) Candle Holder (100 units) Purchased from trader or found in ruins Holds one candle Can be placed on floor or walls Light level 11 Candelabra (300 units) Purchased from trader or found in ruins Holds 3 candles. Can be placed on floor or walls Light level 16 Cast Iron chandelier (800 units) Holds 8 candles Light level 24 Cast Iron Brazier (400 units) Light level 16 Permanent light source Must be filled with 4 firewood and lit manually Cast Iron Torch Holder (200 units) holds torches Cast Iron Cauldron (400 units) Good for making large batches of non meal recipes. 24 portions of non meal recipes Can’t cook meal recipes. Cast Iron Mechanical components Given the recent rumors about a limit on torque or speed for wooden drive trains, the need for an upgrade that can handle high speed high stress mechanical power sources seems like a no brainer! Small Cast Iron Gear (100 units) Large Cast Iron Gear (600 units) Cast Iron Axle (200 units for 2) Cast Iron Flywheel (800 units) Could be retrieved from story location 1 or found in ruins Cast Iron Crankshaft. (200 units) Used for crafting mechanisms and automating bellows and maybe other mechanical stuff! Gearbox which can shift rotation speed up or down via lever Requires Cast Iron components to craft 4 way gear junctions both vertical and horizontal Requires Cast Iron components to craft Metal Clutch, Brake, and Transmission Requires Cast Iron components to craft MISC Cast Iron Stuff Cast Iron Ingot (200 units for 2) Can’t be made into tools, etc, but can be used in a cementation furnace for steelmaking. Cast Iron Plate (200 units) used for crafting lanterns and mechanical components Cast Iron Rod (200 units for 2) used for crafting mechanical components